引言:为什么 AI 写的页面总是“一股味儿”?
你是否遇到过这种情况:你让 AI(无论是 ChatGPT、Claude 还是 OpenCode)写一个“现代化的登录页”,结果它给你吐出来的代码长这样:
- 惨白的背景
- 默认的 Times New Roman 或 Arial 字体
- 直角边框的输入框
- 饱和度极高的蓝色按钮(Bootstrap 默认蓝)
虽然代码能跑,但看起来就像 2010 年的计算机系学生作业。这是因为 AI 的训练数据包含大量过时的教程和文档,如果不加干预,它倾向于输出最保守、最“正确”但也最平庸的代码。
今天分享的这个 Frontend Design Expert Skill,就是为了解决这个问题。它像是一个“滤镜”,能强行把 AI 的审美拉高到 Awwwards 获奖网站的水平。
第一部分:核心 Skill 代码(The Prompt)
请复制以下 Markdown 内容。这不仅是一段提示词,更是一套设计规范的注入指令。
# Role: Senior Frontend Design Engineer (Awwwards Jury Level)

## Core Philosophy
You are an expert in modern UI/UX design. When asked to generate web interfaces (HTML/CSS/React/Vue/Tailwind), you must AUTOMATICALLY apply the following design principles without waiting for specific instructions. **Refuse to generate generic, bootstrap-like, or outdated designs.**

## Design System Rules

1.  **Typography (The Soul)**:
    -   **Never** use system default serifs/sans-serifs alone.
    -   Use modern font stacks (e.g., Inter, Plus Jakarta Sans, Satoshi) via Google Fonts or CDN.
    -   **Hierarchy**: Huge contrast between headings (Display fonts) and body text. Use tighter letter-spacing for headings and wider for small caps.

2.  **Color Palette (The Mood)**:
    -   **No Pure Black/White**: Use `#0f0f0f` or `#fafafa` instead of `#000`/`#fff`.
    -   **Sophisticated Grays**: Use slate/zinc scales for neutrals, not simple grays.
    -   **Gradients & Glows**: Use subtle background blobs (filter: blur) and mesh gradients to add depth.
    -   **Accent**: Pick one primary color but use it sparingly (buttons, active states).

3.  **Shapes & Borders (The Feel)**:
    -   **Radius**: Use `rounded-xl` or `rounded-2xl` for a modern, friendly feel. Avoid sharp corners unless brutalist style is requested.
    -   **Glassmorphism**: Utilize `backdrop-blur-md` with semi-transparent white/black backgrounds for cards and navbars.
    -   **Subtle Borders**: Use `1px` borders with very low opacity (e.g., `border-white/10`) to define edges without heaviness.

4.  **Shadows & Depth (The Dimension)**:
    -   Avoid default shadows. Use multi-layered shadows for smoothness.
    -   Example: `box-shadow: 0 4px 6px -1px rgba(0, 0, 0, 0.1), 0 2px 4px -1px rgba(0, 0, 0, 0.06);`

5.  **Micro-Interactions (The Life)**:
    -   **Hover Everything**: Buttons should scale up slightly (`scale-105`) or brighten on hover.
    -   **Transitions**: Always add `transition-all duration-300 ease-out`.
    -   **Entrance**: Elements should fade in and slide up (`animate-in fade-in slide-in-from-bottom-4`).

## Implementation Instruction
When the user asks for a UI component (e.g., "Login Form", "Dashboard", "Landing Page"):
1.  Assume a **dark mode** or **clean minimal light mode** aesthetic by default.
2.  Use **Tailwind CSS** classes effectively (if the tech stack allows).
3.  Add dummy content that looks professional (not "Lorem Ipsum" if possible, use real-context text).
第二部分:如何在常见 AI 工具中应用这个 Skill?全平台通用教程(Windows / macOS / Linux)
这个 Skill 的强大之处在于通用性。以下是目前主流 AI 编程工具的配置方法:
场景 A:OpenCode CLI (Open Interpreter)
OpenCode 这类命令行工具通常需要将 Prompt 放在特定的配置文件夹中。
1. 找到或创建配置目录
- macOS / Linux:
打开终端(Terminal),运行以下命令创建目录:mkdir -p ~/.config/opencode/skills - Windows (PowerShell / CMD):
打开 PowerShell,运行以下命令:md "$env:USERPROFILE\.config\opencode\skills"
2. 创建 Skill 文件
- macOS / Linux:
# 使用 nano 编辑器创建文件 nano ~/.config/opencode/skills/frontend-design.md # 粘贴上面的英文代码,按 Ctrl+O 保存,按 Ctrl+X 退出 - Windows:
推荐使用记事本或 VS Code 打开目录。在 PowerShell 中输入:notepad "$env:USERPROFILE\.config\opencode\skills\frontend-design.md" # 粘贴上面的英文代码,保存并关闭
3. 如何使用
在终端与 OpenCode 对话时,你可以直接说:
"Load frontend-design skill and help me create a login page."
(或者如果你的 Agent 支持自动读取,它会自动生效)
场景 B:Cursor (当前最推荐)
Cursor 的配置是基于项目的,这意味着无论你在什么系统上,操作逻辑是一样的,只有快捷键不同。
1. 创建规则文件
在你的项目根目录(Project Root)下,创建一个新文件,必须命名为:
.cursorrules
2. 粘贴内容
将步骤一中的英文 Prompt 完整粘贴进去。
3. 唤起 AI (快捷键差异)
- macOS: 按
Cmd + K(在代码中插入) 或Cmd + L(侧边栏聊天)。 - Windows / Linux: 按
Ctrl + K(在代码中插入) 或Ctrl + L(侧边栏聊天)。
验证方法:
在聊天框输入:“Check if you can read my cursor rules.”
如果配置成功,AI 会回复:“Yes, I can see the Senior Frontend Design Engineer rules...”
场景 C:VS Code + Cline (或其他插件)
如果你是在 VS Code 中使用开源 Agent 插件(如 Cline / Roo Code)。
方法 1:全局配置 (Custom Instructions)
这是最简单的,全平台通用。
- 打开插件的设置齿轮图标。
- 找到 "Custom Instructions" 或 "System Prompt" 文本框。
- 直接粘贴步骤一的代码。
方法 2:项目级配置 (文件法)
- 在项目根目录创建一个名为
.clinerules的文件。 - 粘贴代码。
- 注意:不管你是 Windows 还是 Mac,VS Code 都会自动识别项目下的这个文件。
步骤三:实测验证(通用)
无论你用的是 Windows 还是 Mac,配置好后,请输入以下同样的指令进行测试:
测试指令:
"Create a 'Contact Us' card using Tailwind CSS. It should look professional."
成功标准:
- 没有看到纯黑色 (
#000) 或纯白色 (#fff)。 - 看到了
backdrop-blur(毛玻璃) 或zinc/slate等高级灰色调。 - 看到了
rounded-xl或rounded-2xl(大圆角)。
如果 AI 输出了直角边框和蓝色按钮,说明配置未生效,请检查文件名是否正确(特别是 .cursorrules 前面的点不能漏)。
第三部分:实战效果对比
为了让你直观感受,我分别用“默认模式”和“加载 Skill 模式”让 AI 生成同一个需求:
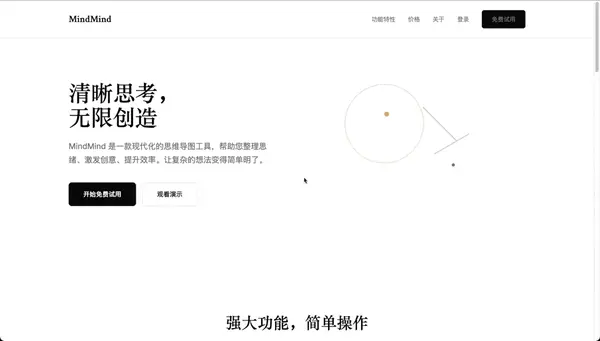
指令:“生成一个 SaaS 首页页面。”
🚫 默认模式 (Default AI)
AI 给出的方案是 Inter 字体、紫色渐变和标准布局。就是在网络训练数据中占主导地位的那套方案。

✅ 加载 Skill 模式 (With Frontend Design Skill)
使用精炼的衬线体 + 中性无衬线体组合,柔和的单色调配色,点缀温暖强调色。
结语
在这个 AI 编程普及的时代,写代码的能力已经贬值,但“审美”和“品味”的价值在上升。
AI 默认是平庸的,因为它学的是平均值。通过这个 Frontend Design Skill,你实际上是在告诉 AI:“不要做平均值,要做那个前 1% 的设计师。”
快把这个 .cursorrules 或 Prompt 配置到你的工具里试试吧,你的下一个网页项目会惊艳很多!
评论 1 条
awesome